Have you ever noticed those pesky dents and gouges on your drywall? It can be frustrating, right? Most of the time, these little damages occur due to accidental bumps, water damage, or even when you take down fixtures.
Discoloration can happen from leaks, and those small holes left behind can be a pain to deal with. Even termite infestations can leave tiny pinholes in your walls.
Clutter plays a huge role in all this. The more stuff you have lying around, the more likely you are to bump into something and create a mark. Think about it—busy areas in your home are often the ones that get dinged up the most.
So, why does this matter? Because keeping your walls in good shape can really elevate the look of your space.
When it comes to fixing these imperfections, there are a few straightforward methods to consider. Try this: assess the damage first. Is it just a dent, or is it deeper? For shallow dents, a little spackle can do wonders.
For gouges or larger repairs, you might need to sand down the area, apply a patch, then repaint. The best part is, you don’t have to have expert skills to make your walls look decent again.
Remember to keep an eye on potential water damage as well; addressing leaks promptly can save you a lot of headaches down the road. Honestly, staying proactive about your drywall will make your life easier in the long run.
In the end, a little upkeep goes a long way. So, what’s your plan for tackling those wall issues?
Key Takeaways
- Accidental bumps from furniture, doorknobs, or playful activity can create dents and gouges in drywall surfaces.
- Water damage from leaks or high humidity results in bulging and discoloration, leading to drywall deterioration.
- Removing fixtures often leaves holes; small ones can be filled, while larger damage may require patching with new drywall.
- Termite infestations cause pinholes and crumbling damage in drywall, typically attracted by moisture.
- Cluttered spaces increase the chances of collisions with walls, resulting in increased drywall wear and tear.
Accidental Bumps and How to Repair Drywall Damage

Accidental bumps happen to the best of us, right? Whether it’s a doorknob hitting the wall or the kids playing too rough, those unsightly dents and gouges can really catch your eye. You might think these imperfections don’t matter much, but they can impact the whole look of a room.
To tackle drywall damage, start with the little stuff. For minor dents, grab some lightweight spackle and a putty knife. Just apply the spackle, then smooth it out until it’s even with the wall. If you’ve got larger gouges, you’ll need to install a backing patch first to make sure your repair is solid.
After the spackle’s applied, here’s the trick: sand the area lightly with 150-grit sandpaper. This step is crucial because it helps avoid any visible flashing that would show through the paint later. So, why does this matter? Addressing these issues promptly not only keeps your walls looking sharp, but it also prevents further damage down the line. Regular checks will help you keep everything in tip-top shape.
Using a quick-drying compound can also speed up the repair process and improve finish quality.
In short, dealing with drywall damage doesn’t have to be a headache. Just a bit of quick repair work can make a world of difference. What’s your next DIY project?
Understanding Water Damage and How to Fix It

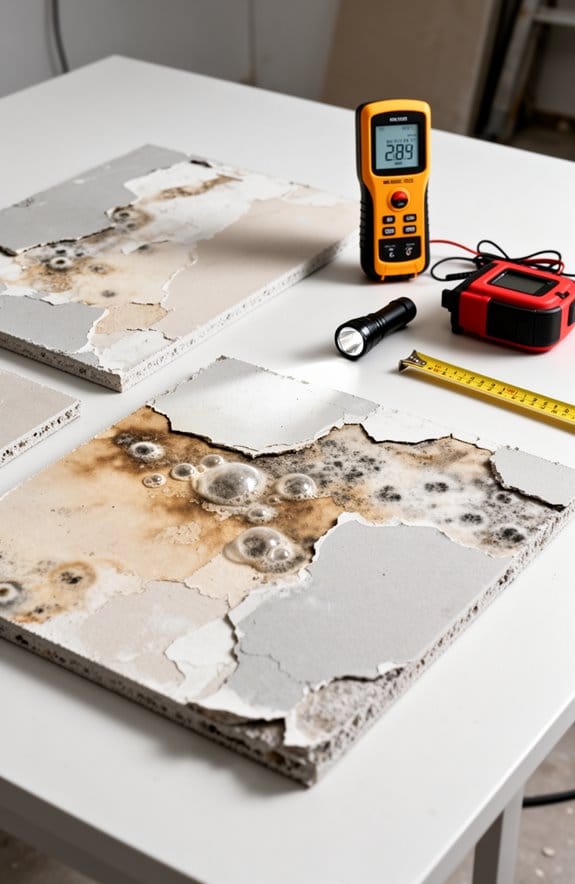
Have you ever noticed those unsightly stains on your drywall? Water damage is one of the most troubling issues you might face as a homeowner. It can stem from pesky leaky pipes, problems with your roof, or even too much humidity in the air. When this happens, you may see signs like discoloration, bulging drywall, or peeling paint, all of which can be pretty alarming.
To tackle water-damaged drywall, it’s crucial to first address the moisture issue. So, figure out where the water is coming from; whether it’s a leak or humidity, you’ll need to stop that before making any repairs. After that, you’ll want to cut out the damaged section. Try cutting about an inch beyond the visibly affected area.
Once you have the damaged drywall out, you can replace it with a new sheet that’s typically ½ inch thick. Make sure it fits snugly and blends in with the surrounding surface. Use joint compound to smooth it over so it looks seamless and fresh.
To avoid future problems, keep an eye on ventilation in your home. Are certain areas prone to dampness? Regularly checking for moisture buildup can save you a lot of headaches down the line.
If mold is suspected after water damage, it’s important to perform rapid mold testing before proceeding with repairs to ensure health and safety.
Truth is, staying proactive with maintenance can help you spot these issues before they get out of hand. So, what’s your plan for preventing water damage in your home?
Removing Fixtures? Here’s How It Can Damage Your Walls

Removing fixtures from your walls can seem like a simple task, but it often leads to unexpected damage. Ever take down a mirror or shelf only to discover unsightly holes in your drywall? It’s frustrating, right? Before you dive in, make sure you have your tools ready: a screwdriver, pliers, spackle, and a putty knife can all come in handy.
After you’ve removed the fixtures, take a close look at the area. Small holes are usually easy to fix—just grab your spackle and fill them in for a seamless finish. But what about larger damage? You might need to cut out the bad section and patch it with new drywall. If that sounds intimidating, don’t hesitate to call in a professional. It’ll save you time and ensure your walls look great. For best results, choose repair kits that offer strong adhesion and quick drying times to make the process smoother.
Why Termite Infestation Threatens Drywall?
Termite infestations can be a huge headache when it comes to your drywall. You might not realize just how much trouble these little pests can cause. They thrive on cellulose, which is found in wood, and that can lead to some serious damage over time. Picture this: a colony can contain thousands of termites, and each one munches on about a fifth of an ounce of wood each day. That’s a lot of munching, isn’t it?
So, what should you look out for? Be on the lookout for signs of termite activity. You might notice small pinholes in your walls, hollow sounds when you tap on them, or crumbling baseboards. And don’t forget – moisture is their best friend. If you see any water-damaged drywall, that could be a red flag.
Here’s the trick: once you spot any of these signs, it’s crucial to act quickly. You’ll want to call in pest control experts right away. Delaying treatment can lead to extensive and expensive repairs that you definitely want to avoid.
Truth is, staying one step ahead of these pests can save you a ton of trouble later. If you’re vigilant and proactive, you can keep your home safe from termite damage. So, how are you planning to protect your drywall from these pesky invaders? Using vapor barrier tape can help reduce moisture levels that attract termites, making it an effective preventative measure.
The Impact of Household Clutter on Drywall Damage
Have you ever noticed how clutter sneaks up on you? It’s not just an eyesore; it can really mess with the condition of your drywall. When you’re rearranging furniture or just trying to find a spot for that new decor, it’s easy to create bumps and dents along the way.
In high-traffic areas, like hallways, keeping items too close to the walls can lead to some serious wear and tear over time. Think about it—how many times have you bumped your doorknob into the wall because there just wasn’t enough space? It happens, especially when you’re living in a place that’s cluttered. Plus, if you’ve got kids running around, they’re bound to collide with walls while playing, adding more scratches or even larger impacts.
So, how can you avoid all this? Regularly organizing your spaces is key. Try this: make it a goal to maintain at least two feet of clearance between any movable items and your walls. This simple step can go a long way in reducing drywall damage and keeping everything looking fresh.
Honestly, it’s surprising how much a little tidiness can help you avoid costly repairs in the future. Not to mention, who doesn’t want a home that looks its best? So, give it a shot—what’s your next step in decluttering? Using rust-resistant materials in repairs can also enhance the longevity of your drywall and ceiling surfaces.
How Foundation Settling Affects Drywall Integrity
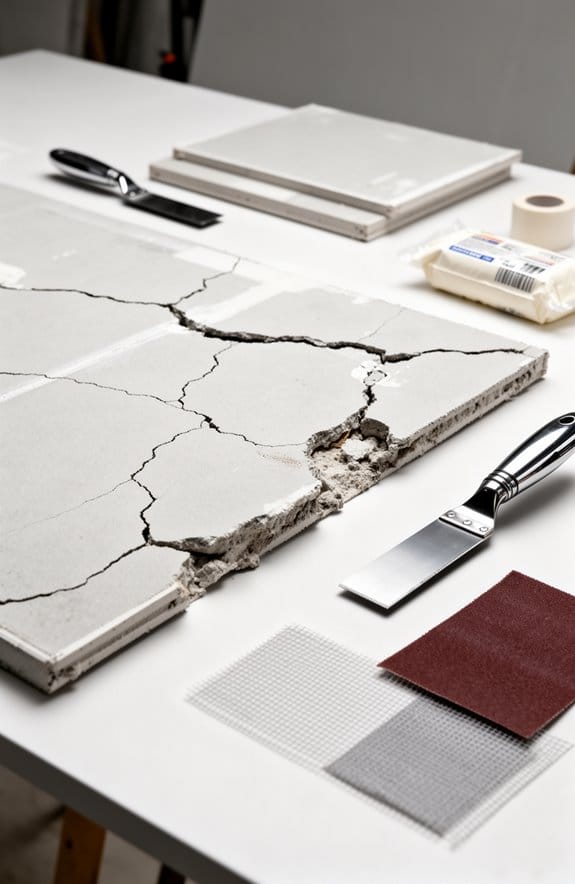
Have you ever noticed cracks in your walls or ceilings and wondered where they came from? It’s not uncommon for homeowners to overlook the effects of a settling foundation, but trust me, it can lead to some serious issues with drywall integrity. As the soil shifts, it puts stress on various surfaces in your home, causing those pesky cracks — especially in corners and ceilings.
These cracks usually start small, but if you don’t address them promptly, they can widen and compromise the overall structure of your drywall. So, what can you do about it? Regular inspections of your home’s interior can help catch these problems early, preventing bigger headaches down the line.
If you spot any damage, reaching out to a professional drywall contractor is a smart move. They can evaluate the impacted areas and perform the necessary repairs. Sometimes this might mean reinforcing those sections to ensure everything remains stable. Honestly, taking timely action not only keeps your home safe but also ensures it looks its best. For minor cracks, products like Red Devil ONETIME Lightweight Spackle offer a quick and durable repair solution.
Avoiding Common Pitfalls in Drywall Installation
Are you tired of dealing with sagging or cracking drywall? You’re not alone, and the good news is there are simple steps to avoid these common troubles during installation.
First off, proper stud spacing is crucial. Aim for 16 inches on center; this helps keep your drywall nice and even. You’ll thank yourself later for taking this step. Also, don’t skimp on screws. Using high-quality screws will help prevent those annoying nail pops that lead to unsightly bumps and dents on your walls.
Now, let’s talk about joint tape and joint compound. Applying joint tape the right way is key, and going for a lightweight joint compound can help keep things smooth. It’s all about that flawless finish! And speaking of the finish, maintaining good ventilation during your work can make a difference. A stable environment lowers the chances of thermal issues later.
Mistakes can happen, so here’s the trick: if you’re working in humid areas, don’t skip on moisture barriers. This helps prevent any warping or deterioration that can arise from roof damage.
In short, by taking these precautions—like ensuring proper stud spacing, using quality materials, and considering moisture—you can really cut down on the risk of dents and gouges. Additionally, using a water-resistant joint compound can enhance durability in challenging environments.
So, what’s stopping you from tackling that drywall project?
Preventive Measures: Tips to Protect Your Drywall
Ever look at your walls and feel the pain of a dent or gouge? If you’ve got kids or pets running around, you know how quickly that can happen. It’s super important to keep our drywall protected, especially when life gets busy.
Here’s a simple suggestion: keep furniture a few inches away from the walls. This small distance can make a big difference in reducing those pesky accidental bumps. You might also want to think about installing corner guards in areas that see a lot of action. If you have little ones or furry friends, these guards can really take a hit for the drywall when they inevitably collide.
Regular wall inspections are key, too. Keeping an eye out for small dents allows you to fix them before they become bigger problems. A little spackle can go a long way to patch things up. When you’re moving furniture, take your time. A gentle touch can really help minimize wall contact.
And if you’re hanging things up, consider using removable adhesive wall hangers instead of nails or screws. They’re great for avoiding those annoying holes that can ruin your wall’s look.
Truth is, taking these small steps can help cushion your drywall from wear and tear over time. Using drywall corner tape on vulnerable edges can also provide extra protection against damage. How do you keep your walls safe in your home?
Repair Options for Dents and Gouges in Drywall
Repairing dents and gouges in drywall can seem daunting at first, but it’s actually a lot easier than you might think. Have you ever looked at a ding in the wall and wondered, “Is this going to be a big fix?” I get it; you want your walls to look their best without breaking the bank.
First things first, tackle the area around the damage. A little cleaning goes a long way. For those annoying small dents, lightweight spackle or joint compound should be your best friend. Just fill in the dent and smooth it out the best you can. Once it’s dried, grab some sandpaper and give it a light sanding until it’s nice and level.
Now, if you’re dealing with a larger gouge, it’s a different ballgame. You’ll need to cut out the damaged section of drywall and replace it with a solid backing patch. Don’t forget to tape the seams for added stability. This part may take a bit more effort, but it’s worth it when everything’s looking smooth again.
After you’re done patching, it’s time to paint. Here’s the trick: always prime the repaired areas before you dive into interior painting. It helps everything blend in seamlessly and avoids that awkward mismatch of colors.
So, why does this matter? Regularly checking your walls can help you catch these little issues early on, saving you from bigger repairs down the line. Using a self-adhesive patch can simplify larger repairs and ensure a durable, long-lasting fix.
Frequently Asked Questions
How to Repair Dents and Gouges in Drywall?
When we tackle drywall repairs, we use drywall patching techniques with common repair tools. After filling, we make certain our paint preparation steps are thorough, adding finishing touches tips to blend everything seamlessly. Let’s make it flawless!
What Causes Dents in Walls?
Dents in walls come from wall impacts, furniture movement, and child activities. Water damage can weaken the structure too. We can all do our part to minimize these issues by being more mindful in our spaces.
What Are Early Stage Termite Pinholes in Drywall?
Early stage termite pinholes in drywall indicate termite damage. During our drywall inspection, we should look for these tiny holes. Timely pest control is essential for effective home maintenance to prevent further structural issues.
What Causes Pockmarks in Drywall Mud?
Pockmarks in drywall mud often stem from air bubbles during mud application, improper mixing, thick layers, and even environmental factors. These elements can create undesirable drywall texture that we all aim to avoid in our projects.