Cleaning dust off surfaces before you start priming isn’t just a step you can skip. It’s crucial for making sure your paint actually sticks. When there’s dust on your drywall, it acts like a barrier, keeping the primer from bonding correctly.
Try this: grab a vacuum with a brush attachment to get rid of all that loose debris. Follow it up with a damp mop to really enhance that surface cleanliness. And if you want to avoid cross-contaminating your cleaning water, consider using the two-bucket method.
Always check for any imperfections too—nobody wants to deal with peeling paint later on.
Here’s the trick: make sure everything’s completely dry before you apply anything. That’s a must! These little steps may seem tedious, but they help you steer clear of major painting problems down the line.
So, why does this matter? Because no one wants to put in all that effort only to have the paint job flop.
Honestly, if you follow these preparations carefully, you’re well on your way to achieving a professional-looking paint job. It’s all about those prep details, right? What’s your go-to cleaning method before you paint?
Key Takeaways
- Dust interferes with primer adhesion, creating barriers that compromise the bond between primer and surfaces, leading to peeling and flaking paint.
- A clean, dust-free surface ensures optimal primer performance, blocking stains and preventing bleeding resins from affecting the final paint job.
- Proper cleaning techniques, such as vacuuming and using damp cloths, enhance surface cleanliness, thereby improving primer adhesion and overall finish quality.
- Skipping cleaning steps can result in visible flaws and reduced durability of the paint job, requiring additional coats and repairs.
- Maintaining dust-free conditions before priming is essential for achieving a professional-looking finish and extending the lifespan of the paint.
The Importance of Dust-Free Surfaces

Getting drywall ready for priming can feel like a chore, but trust me, it’s totally worth it. Ever notice how that pesky dust can ruin your perfect paint job? Dust particles can mess with the bonding between primer and drywall, leading to a flaky finish that no one wants to deal with later.
So, what’s the secret to a dust-free surface? Try this: grab a vacuum with a brush attachment. This tool is perfect for sucking up fine dust without damaging the joint compound you’ve just worked on. Start by vacuuming the whole area—don’t skip the seams and edges, as they often collect more dust than you’d think.
After vacuuming, here’s the trick: take a tack cloth and wipe down the drywall. It’s a simple step that catches any lingering dust, ensuring you end up with a nice, clean surface for priming. Trust me when I say that this extra effort can make all the difference in achieving a smooth application later on.
Honestly, skipping this part can lead to problems down the road. You want that primer to adhere properly for a finish that looks flawless. So, are you ready to make sure your priming job goes off without a hitch? Just remember these steps and you’ll set yourself up for success.
Additionally, applying primer on a properly cleaned surface improves adhesion strength and helps your paint job last longer.
How Dust Affects Primer Adhesion and Finish Quality?

Have you ever wondered why your primer doesn’t seem to stick well to drywall? It turns out, dust could be your biggest culprit! When you’re prepping your walls, getting rid of every speck of dust is crucial to make sure your primer adheres properly. If you skip this step, even tiny particles can create a barrier that makes it nearly impossible for the primer to grab onto the surface. This can lead to issues like peeling or flaking paint—definitely not the look you want.
So, what’s the real deal with dust? It not only messes up adhesion but can also create an uneven surface. You know those wavy lines that show up in the final paint finish? Yep, that’s often due to fine dust particles that you might not even see. The best part is, by taking a little time to thoroughly clean the drywall before you start, you can really minimize these problems. This makes it so much easier for primers, like PVA, to form a nice, smooth base that helps paint stick better.
Don’t forget, when dust is left behind, it really compromises the integrity of your primer. It affects its ability to block stains and prevents resins from bleeding through. So, why does this matter? Well, that little extra effort in preparation can be the difference between a flawless finish and a project you’ll regret later.
To wrap it up, cleaning your drywall properly is essential for a quality paint job. Next time you’re about to prime, take a moment to ask yourself: Are you doing enough to prepare the surface? A clean start can lead to a beautiful end. Also, using the correct application method can help ensure even primer coverage and improve adhesion.
Essential Cleaning Techniques Before Priming

Cleaning drywall before priming is crucial if you want a smooth paint finish. Think about it—when you skip this step, you’re setting yourself up for a less-than-stellar outcome.
Start off by vacuuming the walls. This is a simple but effective way to get rid of dust, especially in those tricky corners and around electrical boxes. Plus, it helps avoid the mess and potential damage that damp rags can cause on freshly taped surfaces.
Here’s the trick: try the two-bucket method for cleaning. One bucket is for clean water, and the other is for the dirty stuff. This minimizes the risk of contaminating the clean water, which is key. Rinsing the walls with clean water not only helps the primer stick better, but it also gets rid of any lightweight kaolin residue that might have settled on the surface.
After you’re done with this thorough cleaning process, you’ll find your walls are now in prime shape for that first coat of primer. So, why does this matter? A dust-free surface leads to a flawless paint application, improving both the look and durability of your finish.
In short, make sure to cover every inch during your cleaning routine. It’ll be worth it in the end. Additionally, using drywall repair kits with moisture-resistant materials ensures that repaired areas maintain integrity beneath primer and paint layers.
Are you ready to get started on your painting project?
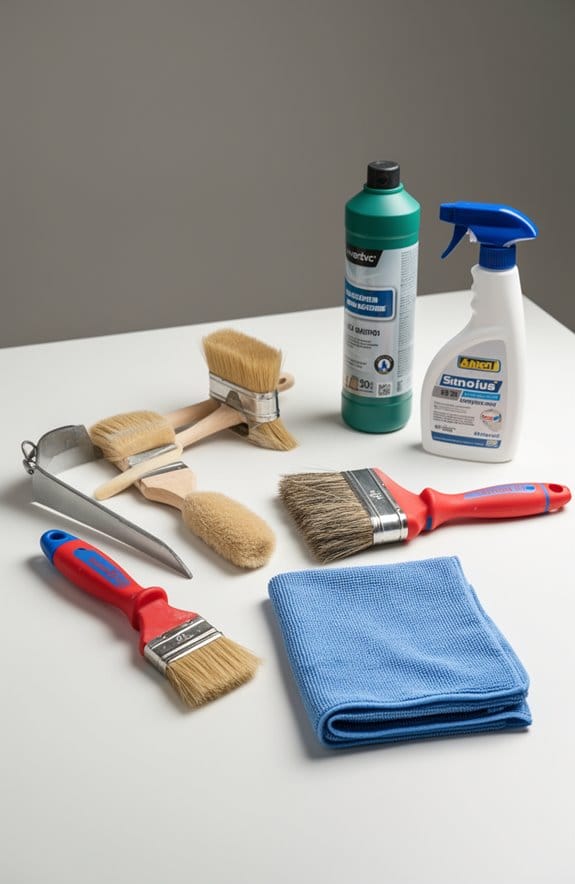
Best Tools to Tackle Dust on Your Drywall
Dust on drywall can be a real headache, especially when you’re trying to create that smooth, perfect finish. It feels like no matter how much you clean, there’s still that fine layer of dust lingering around. So, what can you do to conquer this annoying issue?
First off, a vacuum is your best friend. It’s perfect for those tricky corners and around electrical boxes where you want to be extra careful not to mess up your drywall. Plus, using a pole sander with fine-grit paper—like 220 or finer—will help you get that smooth surface ready for priming while keeping the dust cloud to a minimum.
Here’s the trick: if you’re in a hurry and need a quicker cleanup, grab a mop with a wringable sponge head. Dampen it with some water and get to work! This can really speed things up. And try the two-bucket method—one bucket for clean water and the other for dirty water. This keeps your cleaning efficient and prevents you from spreading grime back onto the walls.
Microfiber cloths are a solid choice for a final touch. They’re gentle on surfaces and won’t damage your drywall, making them great for a light dusting. Truth is, you don’t want to be too rough; a gentle touch can make all the difference in preserving that freshly finished look.
So, why does this matter? Keeping your drywall dust-free is crucial for achieving a great paint job or finish. With the right tools and techniques, you can make this less of a chore. Just remember, it’s all about working smarter, not harder.
Using drywall sanders with built-in vacuums can dramatically minimize dust and simplify cleanup during sanding.
Wrap it all up, and you’ve got the tools to tackle dust like a pro! What’s your go-to method for cleaning drywall?
Top Cleaning Mistakes That Compromise Priming
Have you ever found yourself frustrated with paint that just doesn’t stick? One common pitfall is using damp rags on freshly taped drywall surfaces. Trust me, that can really mess up your finish and lead to uneven priming down the line. It’s one of those things that seems harmless but can do a lot of damage if you’re not careful.
Another mistake? Not getting rid of that heavy drywall dust. It’s a small step but absolutely crucial for good paint adhesion and a nice finish. Instead of grabbing a broom, reach for a vacuum. It’s the best way to clean out dust from electrical boxes and rough openings. Brooms and rags may leave behind particles that ruin your hard work.
You might be tempted to skip some of the usual cleaning best practices, but that can really backfire. For instance, using the two-bucket method and rinsing your tools often can help ensure a smooth application. If you don’t, you could end up with poor adhesion and visible flaws that you really don’t want to see after you’ve put in all that effort.
Truth is, proper cleaning is vital. You don’t want to overlook this step; it could make or break your priming job. So, before diving in, take a moment to double-check that your drywall is ready. Using patches made from durable materials can improve the overall quality of your repair and finish.
What cleaning habits will you adopt to make sure your priming goes off without a hitch?
Why Priming Is Essential for Professional Paint Jobs
Preparing a surface properly is really the first step towards a great paint job. You might be wondering why adding primer is so important. Well, it boosts paint adhesion, which means your finish will last longer and won’t start peeling off after a few months.
When you use a good primer, you make sure the paint’s true color really pops. It leads to that sleek, professional finish everybody’s after. Here’s the trick: a decent coat of primer can even ensure that you can often get away with just one layer of your topcoat, especially on surfaces that are challenging like stained wood.
If you’re working with new drywall or fresh plaster, don’t skip the primer! It blocks stains and resins from bleeding through, which guarantees a smooth surface to work with. Honestly, taking time for proper priming transforms the quality of your paint job, making it look so much better and helping it stand up to wear and tear. Additionally, cleaning and surface preparation such as sanding and patching play a critical role before priming to ensure perfect adhesion and a flawless finish.
What to Check on Your Drywall Before Priming?
Before diving into priming your drywall, ask yourself: is your surface ready for it? You want to check a few essential things to make sure the application goes as smoothly as possible.
First up, grab a microfiber cloth and give your drywall a good wipe-down. Dust can sneak in and mess up that flawless finish you’re aiming for. Next, take a close look at those joint compound spots and tape seams—if they’re uneven, take a moment to smooth them out.
Now, let’s talk about cleanliness. If there’s any kaolin coating on your drywall, that could throw a wrench in your primer sticking well. So, make sure that surface is squeaky clean.
And don’t forget about moisture! Confirm that your drywall is completely dry and free from any water damage. It’s easier to tackle these issues now than fix them later, right?
To wrap it up, make sure all necessary repairs are handled before you start cleaning. You don’t want to risk messing up that freshly cleaned surface by addressing damages afterward. So, are you ready to get that drywall primed?
Using a wall mending agent with good adhesion strength ensures that repairs hold firm before priming.
Tips for Long-Lasting Paint Results After Priming
Want your paint job to stand the test of time? Getting those long-lasting results after priming isn’t just about slapping on some color. There’s a few steps that can really boost the durability of your paint and keep it looking fresh for years.
First off, you need to make sure that your primed surface is spotless. Give it a good wipe with a clean dust rag and say goodbye to any dust or dirt. You don’t want that stuff getting trapped under your topcoat, trust me—it’ll end up causing your paint to peel and ruin all your hard work.
Another important tip? Time your topcoat application carefully. Aim to paint within the primer’s recommended drying window, which is usually between 1 and 4 hours. Choose a high-quality paint that’s suitable for the surface you’re working on. And when you start painting, remember to use even strokes for the best coverage.
After you’ve put down that final coat, hang tight for about 30 days. I know it’s hard to wait, but allowing the paint ample time to fully cure will solidify that beautiful finish. The longer you let it set, the better those results will be.
In short, the key to a long-lasting paint job starts with a clean surface, timely topcoats, and a little patience. Also, consider using mildew resistant paints to protect your walls from mold growth and maintain that fresh look longer. So next time you’re gearing up for a paint project, keep these tips in mind. They really make a difference in how your work holds up. What’s your next DIY project?
Frequently Asked Questions
Do I Need to Wipe Dust off Drywall Before Priming?
Like a canvas awaiting a masterpiece, we should wipe off dust accumulation from drywall before priming. It’s essential; we guarantee a pristine surface that’ll allow our paint to adhere beautifully, avoiding future imperfections together.
Do You Need to Clean Dust off Walls Before Painting?
Yes, we need to clean dust off walls before painting. Dust impact can cause imperfections and affect adhesion, leading to a less durable finish. A clean surface guarantees our paint job looks great and lasts longer.
What Happens if You Don’t Clean Walls Before Primer?
If we don’t clean walls before primer, dust can create uneven textures and weaken adhesion. We’ll likely face peeling and discoloration later on. Let’s prioritize dust prevention for a flawless, long-lasting finish!
How to Clean a Surface Before Priming?
To clean a surface before priming, we’ll vacuum and sweep thoroughly, using the two-bucket method. It may seem tedious, but proper surface preparation guarantees a flawless finish we’ll all be proud of!


