As an Amazon Associate, we earn from qualifying purchases. Some links may be affiliate links at no extra cost to you. Although our opinions are based on curated research, we haven't used these products. Articles generated with AI.
10 Best Ceiling Hole Repair Solutions That Make Fixing Easy
To easily fix ceiling holes, consider these products: the Hyde Popcorn Ceiling Patch Kit with four patches and joint compound, the Sugelary Drywall Patch Kit that includes a scraper, and the DIYSELF 9 Pack Kit with 200g of repair paste. For larger holes, use the Ranekie 14 Pack with various aluminum mesh patches. Don’t forget the 3M High Strength Crack Repair for durability. Evaluate drying times and guarantee you match textures for a seamless finish. More details follow.
Key Takeaways
- Popcorn Ceiling Repair Kits offer easy-to-use patches that adhere directly to damaged areas for quick and seamless repairs.
- Quick-Drying Solutions like DIYSELF kits minimize waiting time, ensuring a faster completion of your repair tasks.
- All-in-One Drywall Repair Kits provide all necessary tools, including joint compound and scrapers, simplifying the repair process.
- Specialized Products such as DAP DryDex indicate when the repair is ready to sand and paint, ensuring accuracy for all skill levels.
- Heavy-Duty Kits with various patch sizes ensure compatibility with different hole dimensions and increased durability for long-lasting fixes.
| Hyde Popcorn Ceiling Patch Repair Kit | 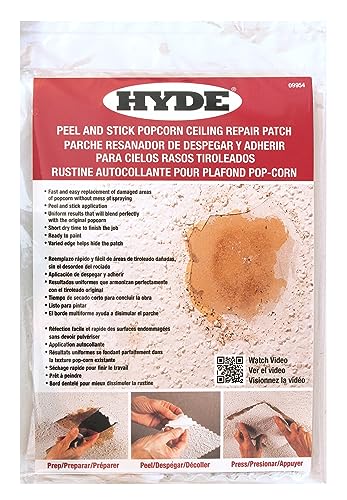 | Quick & Easy Fix | Application Type: Peel and stick | Repair Paste Included: Joint compound (2 oz) | Sanding Included: Not applicable | VIEW LATEST PRICE | Read Our Analysis |
| Sugelary Drywall Patch Repair Kit with Scraper |  | Best All-Rounder | Application Type: Extrude and scrape | Repair Paste Included: Wall spackle paste | Sanding Included: Yes (sandpaper included) | VIEW LATEST PRICE | Read Our Analysis |
| DIYSELF 9 Pack Drywall Repair Kit |  | Complete DIY Kit | Application Type: Squeeze and scrape | Repair Paste Included: Repair paste (2x100g) | Sanding Included: Yes (sandpaper included) | VIEW LATEST PRICE | Read Our Analysis |
| Drywall Repair Kit with Spackle and Patch | 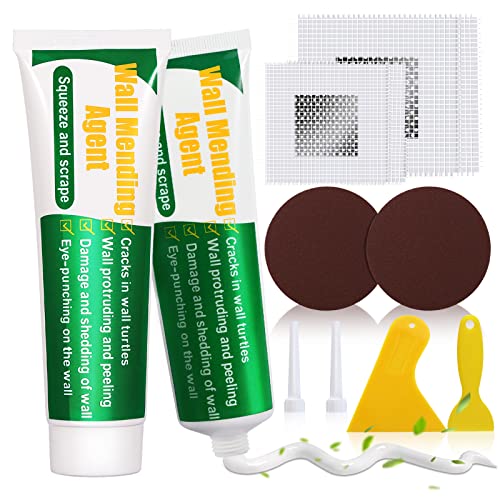 | Fast-Drying Solution | Application Type: Squeeze and scrape | Repair Paste Included: Wall repair paste (2x100g) | Sanding Included: Yes (sandpaper included) | VIEW LATEST PRICE | Read Our Analysis |
| Ranekie 14 Pack Drywall Repair Patch Kit |  | Heavy-Duty Performance | Application Type: Apply patch and plaster | Repair Paste Included: Not applicable | Sanding Included: Yes (sandpaper included) | VIEW LATEST PRICE | Read Our Analysis |
| DAP DryDex Dry Time Indicator Spackling Pink/White 32 Oz (7079812330) |  | Indicator for Precision | Application Type: Squeeze tube application | Repair Paste Included: DryDex spackling (32 oz) | Sanding Included: Not applicable | VIEW LATEST PRICE | Read Our Analysis |
| Seloom Drywall Repair Kit – Heavy Duty Mesh Patch | 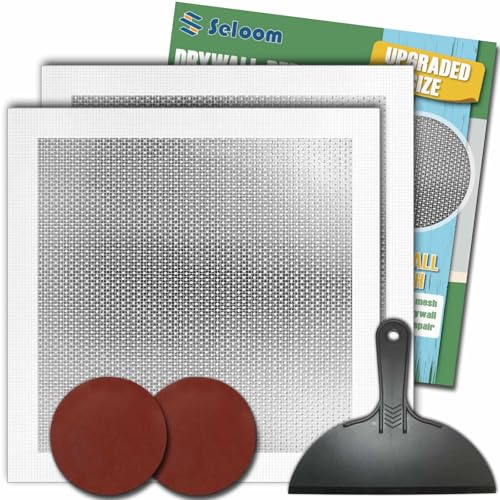 | Large Area Coverage | Application Type: Self-adhesive patch | Repair Paste Included: Not applicable | Sanding Included: Yes (sandpaper included) | VIEW LATEST PRICE | Read Our Analysis |
| Drywall Repair Kit with Wall Repair Putty |  | Comprehensive Repair Set | Application Type: Squeeze and patch | Repair Paste Included: Repair putty (8.5 oz) | Sanding Included: Yes (sandpaper included) | VIEW LATEST PRICE | Read Our Analysis |
| Drywall Repair Kit with Wall Spackle and Scraper | 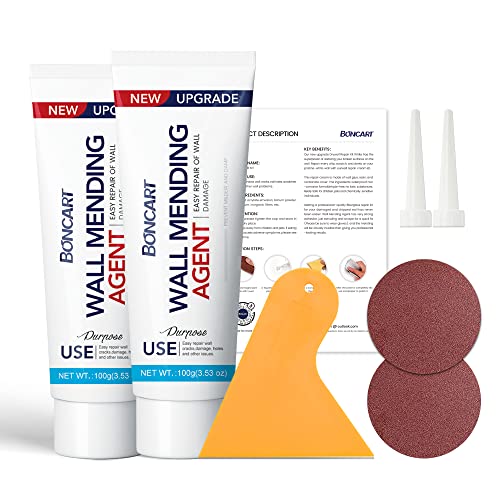 | Seamless Application | Application Type: Squeeze and smooth | Repair Paste Included: Wall mending agent (2x100g) | Sanding Included: Yes (sandpaper included) | VIEW LATEST PRICE | Read Our Analysis |
| 3M High Strength Crack Repair Squeeze Tube (7 oz) |  | Fast & Strong Repair | Application Type: Squeeze tube application | Repair Paste Included: Not applicable | Sanding Included: Not applicable | VIEW LATEST PRICE | Read Our Analysis |
More Details on Our Top Picks
Hyde Popcorn Ceiling Patch Repair Kit
The Hyde Popcorn Ceiling Patch Repair Kit is an excellent choice for homeowners needing a quick and effective solution for popcorn ceiling repairs. This kit includes two 9×6-inch patches and two 4-inch round patches, along with 2 ounces of joint compound drywall mud and cotton swabs. To use it, simply peel the backing off the patch and stick it over the damaged area. There’s no need for additional tools, like scrapers. The patch’s varied edges guarantee a seamless blend with your ceiling. You’ll enjoy immediate results, as the no wait-time feature allows you to complete repairs in one step.
- Application Type:Peel and stick
- Repair Paste Included:Joint compound (2 oz)
- Sanding Included:Not applicable
- Weather Resistance:Not specified
- User-Friendly Design:Easy peel-and-stick
- Included Tools:Cotton swabs
- Additional Feature:Peel-and-stick application
- Additional Feature:Quick no wait-time
- Additional Feature:Seamless finish blending
Sugelary Drywall Patch Repair Kit with Scraper
If you need a reliable solution for repairing holes or imperfections in your walls, the Sugelary Drywall Patch Repair Kit with Scraper is an excellent choice. This kit includes 100g of wall repair paste, a nozzle extender, a scraper, rubber gloves, and sandpaper. You can easily apply the patch by extruding the paste and scraping it to create a smooth finish. For best results, make certain you wear gloves during application. The advanced formula provides strong adhesion and works well on both indoor and outdoor surfaces. Remember to shake the spackle before use, especially if it’s been sitting for a while.
- Application Type:Extrude and scrape
- Repair Paste Included:Wall spackle paste
- Sanding Included:Yes (sandpaper included)
- Weather Resistance:Suitable for indoor/outdoor
- User-Friendly Design:Easy application with scraper
- Included Tools:Scraper and gloves
- Additional Feature:Suitable for outdoor surfaces
- Additional Feature:Advanced strong adhesion formula
- Additional Feature:Ideal for multiple surfaces
DIYSELF 9 Pack Drywall Repair Kit
For homeowners and DIY enthusiasts seeking efficient solutions to ceiling repairs, the DIYSELF 9 Pack Drywall Repair Kit offers an all-in-one approach. This kit includes 200g of repair paste, extended nozzles, a scraper, sandpaper, painter’s tape, and gloves. The fast-drying spackle provides strong adhesion to minimize peeling and cracking. To apply, clean the surface first, then use the scraper to spread the paste evenly. After it dries, sand the area with the 240-grit sandpaper for a smooth finish. Use painter’s tape to protect adjacent surfaces. Store the kit in a cool, dry place, and customer support is available for guidance.
- Application Type:Squeeze and scrape
- Repair Paste Included:Repair paste (2x100g)
- Sanding Included:Yes (sandpaper included)
- Weather Resistance:Not specified
- User-Friendly Design:Easy and mess-free application
- Included Tools:Scraper, sandpaper, gloves, tape
- Additional Feature:Fast-drying spackle formula
- Additional Feature:Extended nozzles for control
- Additional Feature:Comprehensive 9-piece kit
Drywall Repair Kit with Spackle and Patch
Achieving seamless wall repairs is easier with a Drywall Repair Kit featuring spackle and patches, perfect for homeowners, DIY enthusiasts, and even professionals. This kit includes two 100g wall repair pastes, two scrapers of different sizes, and patches, making it versatile for various repairs. Simply squeeze the spackle onto the damaged area, use a scraper to spread and smooth the surface, and let it dry for about four hours. The waterproof and crack-resistant formula guarantees durability. For an invisible finish, sand the area lightly after drying. Plus, the kit’s materials are safe for children and pets, providing peace of mind.
- Application Type:Squeeze and scrape
- Repair Paste Included:Wall repair paste (2x100g)
- Sanding Included:Yes (sandpaper included)
- Weather Resistance:Waterproof
- User-Friendly Design:Simple squeeze and smooth
- Included Tools:Scrapers included
- Additional Feature:Nearly invisible repairs
- Additional Feature:Water-resistant and durable
- Additional Feature:Safe for all ages
Ranekie 14 Pack Drywall Repair Patch Kit
The Ranekie 14 Pack Drywall Repair Patch Kit is an excellent choice for anyone facing wall damage, whether in a home, office, or factory. It includes 14 aluminum mesh patches in sizes of two 10-inch, two 8-inch, and ten 4-inch. To assist with repairs, you’ll find a large scraper and two pieces of 240 grit sandpaper.
Start by sanding the damaged area for cleanliness. Next, apply the patch and use the scraper to apply plaster. Sand the surface afterward for a smooth finish. This kit offers durable, long-lasting repairs, ensuring your walls return to their original state with ease.
- Application Type:Apply patch and plaster
- Repair Paste Included:Not applicable
- Sanding Included:Yes (sandpaper included)
- Weather Resistance:Not specified
- User-Friendly Design:User-friendly application process
- Included Tools:Large scraper and sandpaper
- Additional Feature:Multi-size aluminum mesh patches
- Additional Feature:Lightweight yet strong materials
- Additional Feature:Corrosion and moisture-resistant
DAP DryDex Dry Time Indicator Spackling Pink/White 32 Oz (7079812330)
DAP DryDex Dry Time Indicator Spackling, in its convenient 32-ounce size, is ideal for both novice and experienced DIYers tackling ceiling hole repairs. This latex polymer spackling applies pink and dries white, making it easy for you to see when it’s ready. Typically, it dries within 1 to 5 hours. For shallow repairs up to 1/8 inch deep, it can dry in just 1 hour. If your hole is deeper, apply multiple layers, allowing drying time between each. It works effectively on various surfaces like drywall, plaster, and wood, ensuring a professional finish that won’t crack or shrink.
- Application Type:Squeeze tube application
- Repair Paste Included:DryDex spackling (32 oz)
- Sanding Included:Not applicable
- Weather Resistance:Suitable for indoor/outdoor
- User-Friendly Design:Easy application with squeeze tube
- Included Tools:Not specified
- Additional Feature:Color-changing indicator
- Additional Feature:Multiple layer capability
- Additional Feature:No cracking or shrinking
Seloom Drywall Repair Kit – Heavy Duty Mesh Patch
For homeowners and DIY enthusiasts facing large wall damages, the Seloom Drywall Repair Kit with its 12-inch self-adhesive mesh patch is a practical choice. This kit is ideal for repairing cracks, holes, and dents, providing ample coverage. It includes high-quality materials that guarantee a seamless finish. To use it, clean the damaged area first, then cut the patch as needed. Peel the backing and firmly adhere it to the wall. Smooth it out using the included scraper. Finally, apply spackle over the patch, let it dry, and sand it for a polished look. This kit makes repairs straightforward and effective.
- Application Type:Self-adhesive patch
- Repair Paste Included:Not applicable
- Sanding Included:Yes (sandpaper included)
- Weather Resistance:Not specified
- User-Friendly Design:Designed for easy use; no skills needed
- Included Tools:Scraper and sandpaper included
- Additional Feature:Large self-adhesive patch
- Additional Feature:Professional seamless finish
- Additional Feature:Durable fiberglass mesh construction
Drywall Repair Kit with Wall Repair Putty
Choosing the drywall repair kit with wall repair putty is ideal for anyone looking for a reliable and thorough solution. This complete kit includes 8.5 ounces of repair putty, two 2-inch patches, and one 4-inch patch. You also get two pieces of sandpaper and four plastic scrapers to help with application. The waterproof putty dries quickly and guarantees a strong bond, while the aluminum patches provide lightweight durability. Suitable for various surfaces, it’s perfect for homes or offices. Follow the instructions for easy application to enhance your space, making it look professional and polished in no time.
- Application Type:Squeeze and patch
- Repair Paste Included:Repair putty (8.5 oz)
- Sanding Included:Yes (sandpaper included)
- Weather Resistance:Waterproof
- User-Friendly Design:Easy for DIY and professional use
- Included Tools:Plastic scrapers and sandpaper
- Additional Feature:Waterproof mending agent
- Additional Feature:Quick-drying performance
- Additional Feature:Multipurpose for various surfaces
Drywall Repair Kit with Wall Spackle and Scraper
If you’re looking for a reliable solution to quickly fix wall damage, the Drywall Repair Kit with Wall Spackle and Scraper is an excellent choice. This kit includes two 100g tubes of wall mending agent, two nozzle extenders, one scraper, and two pieces of sandpaper. To use, gently squeeze the spackle into the damaged area, then smooth it using the scraper. Once dried, sand the surface lightly for a smooth finish. This mending agent is waterproof and virtually invisible after application. Remember, if you have questions, fast customer support is available to assist you. Enjoy your improved walls!
- Application Type:Squeeze and smooth
- Repair Paste Included:Wall mending agent (2x100g)
- Sanding Included:Yes (sandpaper included)
- Weather Resistance:Not specified
- User-Friendly Design:Easy squeeze application
- Included Tools:Nozzle extenders, scraper, sandpaper
- Additional Feature:Upgraded formaldehyde-free formula
- Additional Feature:Mending results virtually invisible
- Additional Feature:Customer support available
3M High Strength Crack Repair Squeeze Tube (7 oz)
Repairing ceiling holes and cracks can be a straightforward task with the 3M High Strength Crack Repair Squeeze Tube (7 oz). This product suits large holes and cracks in drywall, plaster, stucco, concrete, and wood. Start by cleaning the damaged area. Use the precision tip for direct application, filling cracks evenly. This squeeze tube allows you to apply the repair material quickly, making it three times faster than traditional spackling methods. Once dry, sand the surface for a smooth finish. It’s lightweight yet fiber-reinforced, preventing shrinkage or sagging, ensuring a strong and lasting repair for both interior and exterior surfaces.
- Application Type:Squeeze tube application
- Repair Paste Included:Not applicable
- Sanding Included:Not applicable
- Weather Resistance:Suitable for indoor/outdoor
- User-Friendly Design:Easy application with precision tip
- Included Tools:Not specified
- Additional Feature:Precision tip application
- Additional Feature:3X faster repair time
- Additional Feature:Fiber reinforced strength
Factors to Consider When Choosing Ceiling Hole Repair
When choosing a ceiling hole repair solution, consider the contents of the repair kit. You’ll want to evaluate how easy the application method is, especially if you’re a beginner. Additionally, think about surface compatibility, drying time, and the strength of adhesion to guarantee a lasting fix.
Repair Kit Contents
Selecting the right ceiling hole repair kit is vital for achieving a seamless finish. First, check the patch sizes; they should match the dimensions of your hole or damage. A versatile kit usually includes various materials like patches, spackle, and different surface types’ compounds. Look for kits that come with application tools such as scrapers and sandpaper, which help create a smooth finish. It’s also wise to choose kits with enough repair paste or compound for larger projects, minimizing your need for additional purchases. Finally, consider safety; many kits include gloves for safe handling during application. These features guarantee your repair process is efficient and effective, leading to reliable results.
Application Method Ease
Finding the right application method can greatly impact the success of your ceiling hole repair. Consider using peel-and-stick solutions, as these simplify the process without requiring extra tools. Look for products that seamlessly blend with your existing ceiling texture, guaranteeing a professional finish. Evaluate methods that allow for immediate use; choosing a quick-drying solution saves you time. A good kit should include all necessary tools, such as a 4-inch scraper and lightweight joint compound, for easy application. Finally, check for patch shapes and sizes tailored for various hole dimensions, from small pinholes to larger damages, making your repair straightforward. These features guarantee that the method you choose enhances the quality and efficiency of your repair work.
Surface Compatibility Considerations
To achieve a successful ceiling hole repair, it’s essential to evaluate the compatibility of the repair product with your ceiling’s material. Different ceilings, like drywall or plaster, require specific repair solutions. Confirm the product matches the existing texture—like popcorn or smooth finishes—to keep a uniform look. Choose materials designed for ceilings, as they often resist sagging or shrinking from overhead application. Verify the repair product can bond effectively to the surface, providing durability against movement or settling. If your ceiling is exposed to moisture, check that the material is suitable for indoor or outdoor use. This careful assessment helps confirm the longevity and appearance of your repair, saving you time and effort in the long run.
Drying Time Requirements
When repairing a ceiling hole, understanding drying time requirements is crucial for a successful outcome. The type of repair material you choose greatly influences drying times. Quick-drying spackling compounds can cure within 1 to 5 hours, making them ideal for swift fixes. However, environmental factors like humidity, temperature, and the thickness of the material can extend these times. Always follow the manufacturer’s instructions to guarantee the best results. You should check for complete drying before adding layers or finishing touches. A simple way to test is by gently pressing the surface; if it’s hard and not tacky, you’re ready to proceed. Choosing products designed for minimal wait times can help streamline your project.
Adhesion Strength Evaluation
Choosing the right repair material is essential for guaranteeing adhesion strength, which keeps your ceiling patch securely in place. A strong bond prevents peeling and future damage. Consider using aluminum mesh or fiberglass, as they have different adhesion properties. When selecting materials, check their suitability for your environment, especially if humidity or temperature varies greatly. For best results, apply the product according to the manufacturer’s guidelines, typically using a 4-inch putty knife for smooth application. Before finalizing the repair, perform visual checks and gently tug on the patch to test adhesion strength. If it holds firmly, you’re on the right track. This evaluation helps guarantee a reliable, long-lasting repair for your ceiling.
Aesthetic Finish Quality
Achieving a seamless aesthetic finish in ceiling hole repairs demands careful consideration of material choice and repair techniques. Select materials that mimic the existing ceiling texture and color for ideal results. Use a peel-and-stick drywall patch, which measures 6 inches by 6 inches, for consistency and uniformity. Quick-drying compounds are your best bet, as they speed up the repair process and guarantee a neat finish. Before applying paint, sand the repair area with a 220-grit sandpaper to smooth out any uneven surfaces. This step greatly enhances the repair’s visual quality. Afterward, apply primer and paint that matches your ceiling’s color. Follow these procedures to achieve a professional-looking repair and maintain your ceiling’s aesthetic integrity.
Versatility Across Materials
To guarantee effective ceiling hole repairs, it’s essential to contemplate the versatility of your repair materials. Choose products suitable for various surfaces, such as drywall, plaster, wood, and concrete. This assures you can tackle different issues efficiently. Look for repair solutions with strong adhesion properties; they bond well to prevent peeling or cracking post-application. Consider kits designed for both interior and exterior use, which enhances their practicality in multiple environments. Quick-drying and easy-to-apply products will streamline your repair process across ceilings. Finally, select options that address various wall problems like cracks, holes, and stains, providing an all-embracing solution to your ceiling repair needs. Always read labels for specific application instructions and drying times.
Safety and Non-Toxicity
When selecting a ceiling hole repair product, it’s crucial to prioritize safety and non-toxicity, especially in homes with children or pets. Look for formulas free from formaldehyde and harmful toxins to guarantee everyone’s well-being. Many modern compounds are designed to be environmentally friendly, offering safer indoor use. Choose products labeled “water-based” or “low-VOC,” as these options are generally less harmful and support better indoor air quality. Always check for safety certifications, which indicate rigorous testing for harmful substances. Using non-toxic materials lowers the risk of allergic reactions or respiratory issues, helping you create a healthier living environment post-repair. Prioritizing these factors will lead to a safer home for you and your loved ones.
Frequently Asked Questions
How Long Does Ceiling Repair Typically Take?
Ceiling repair usually takes about 1 to 3 hours, depending on the size of the hole and your skill level. Start by gathering tools: a drywall patch, joint compound, a putty knife, and sandpaper. Measure the hole, cut the patch to fit, and secure it with screws. Apply joint compound, let it dry, then sand until smooth. Finally, paint over the repaired area for a seamless finish. Plan for adequate drying time during the process.
Can I Use These Kits for Larger Holes?
You can’t typically use standard repair kits for larger holes. Most kits work well for holes up to 6 inches in diameter. For anything larger, you’ll need to create a patch from drywall, measuring a piece larger than the hole by at least one inch on each side. Use a utility knife for cutting, and a drywall saw for larger jobs. Secure the patch with screws and apply joint compound for a smooth finish.
What Tools Are Needed Alongside These Kits?
You’ll need several tools alongside your repair kit. Grab a utility knife to cut drywall, a drywall saw for larger openings, and a measuring tape for accurate sizing. Use a T-square to guarantee straight cuts, and a level to keep your patch aligned. A drill with screws will secure the patch, while a putty knife helps smooth joint compound. Don’t forget sandpaper, ideally 120-grit, to finish the surface before painting.
Are There Any Safety Precautions I Should Take?
When repairing ceiling holes, you should take several safety precautions. First, wear protective goggles to shield your eyes from dust and debris. Also, use a dust mask to avoid inhaling particles. If using a ladder, make sure it’s stable and positioned correctly before climbing. Before you start working, check for any electrical wires or plumbing behind the ceiling. Mark their locations to prevent damage and personal injury during the repair process.
How Do I Clean up After the Repair Process?
After completing your repair, you’ll want to tidy up like a painter finishing a masterpiece. Start by removing any debris, including dust and scraps, using a broom or vacuum. Next, gently wipe the repaired area with a damp cloth to remove excess dust. Be sure to check your tools; store them in their proper places. Finally, put away protective coverings, allowing the area to look neat and ready for use once again.